
Heroku 环境准备
什么是 Heroku?
Heroku 是一个支持多种编程语言的 PaaS(Platform-as-a-Service)。在 2010 年被 Salesforce 收购。Heroku 作为最开始的云平台之一,从 2007 年 6 月起开始开发,当时它仅支持 Ruby,后来增加了对 Java、Node.js、Scala、Clojure、Python 以及 PHP 和 Perl 的支持。
为什么选用 Heroku?
- Heroku 的部署上线流程异常简单。你只需要将源代码纳入到 Git 版本控制系统中即可,其它额外操作 Heroku 都会帮你自动处理好。
- Heroku 提供给开发者的免费套餐非常丰富。其中包括最多 5 个应用的免费创建,自定义域名的支持等。实乃良心商家。唯一的不足就是有时候在国内访问速度会比较慢。
- Heroku 产品服务在业内评价特别高。在 Rails 圈子中许多有经验的开发者都会使用 Heroku 来部署上线自己的 Demo 应用,其部署流程和速度都受到了 Rails 社区成员的广大好评。
Heroku 的基本安装及配置
首先我们先 注册一个 Heroku 账号。
注册完成之后使用 Heroku Toolbelt 来安装 Heroku 客户端。
安装完毕后使用 heroku version 来检查当前系统是否已安装好 Heroku 客户端:
如果有类似下面的输出,则代表 Heroku 客户端已成功安装:
1
2
| $ heroku version
heroku/7.18.3 win32-x64 node-v10.12.0
|
安装成功之后,你需要使用以下命令来登录你的 heroku 账号:
然后添加 SSH 密钥:
至此,Heroku 的基本安装及配置已完成。下一步我们开始尝试将应用部署到 Heroku 上。
部署 OLAINDEX 到 Heroku 上
新建 OLAINDEX 项目
新建 OLAINDEX 项目目录并从 Composer 拉取创建包
1
2
| composer create-project wangningkai/olaindex olaindex "dev-master"
cd olaindex
|
初始化 Git 仓库
1
2
3
| $ git init
$ git add .
$ git commit -m "new OLAINDEX project"
|
创建 Procfile
要将应用部署到 Heroku 上,你需要新建一个 Procfile 文件,这个文件的作用是通过正确的配置来告诉 Heroku 应用应当使用什么命令来启动 Web 服务器。
将配置写入 Procfile 文件并将其纳入 Git 版本控制中:
1
2
3
| $ echo web: vendor/bin/heroku-php-apache2 public/ > Procfile
$ git add .
$ git commit -m "Procfile for Heroku"
|
在 Heroku 上创建一个新应用
我们可以使用 heroku create 命令在 Heroku 上创建一个新应用:
命令行会输出类似如下信息:
1
2
3
| Creating xxxx-xxx-1234... done, stack is cedar-14
http://xxxx-xxx-1234.herokuapp.com/ | git@heroku.com:xxxx-xxx-1234.git
Git remote heroku added
|
mighty-hamlet-1982 是 Heroku 随机为应用生成的默认名称,每个人生成的名称都不相同。http://xxxx-xxx-1234.herokuapp.com/ 则是应用的线上地址。
如果你对生成的默认名称不满意,你可以使用 heroku rename 来对应用名称进行更改,但要保证更改的名称未被其它人占用。如:
1
| $ heroku rename imwnk-olaindex
|
声明 buildpack
Heroku 对多种语言进行了支持,因此在应用部署的时候它会去自动检查应用的代码是用什么语言写的,然后再接着执行一系列针对该语言的操作。Laravel 的应用默认会包含 package.json 文件,但当 Heroku 检查到该文件时,它会认为此应用是用 Node.js 写的,因此我们需要对应用的 buildpack 进行声明,告诉 Heroku 我们的应用是用 PHP 写的。声明命令如下:
1
| $ heroku buildpacks:set heroku/php
|
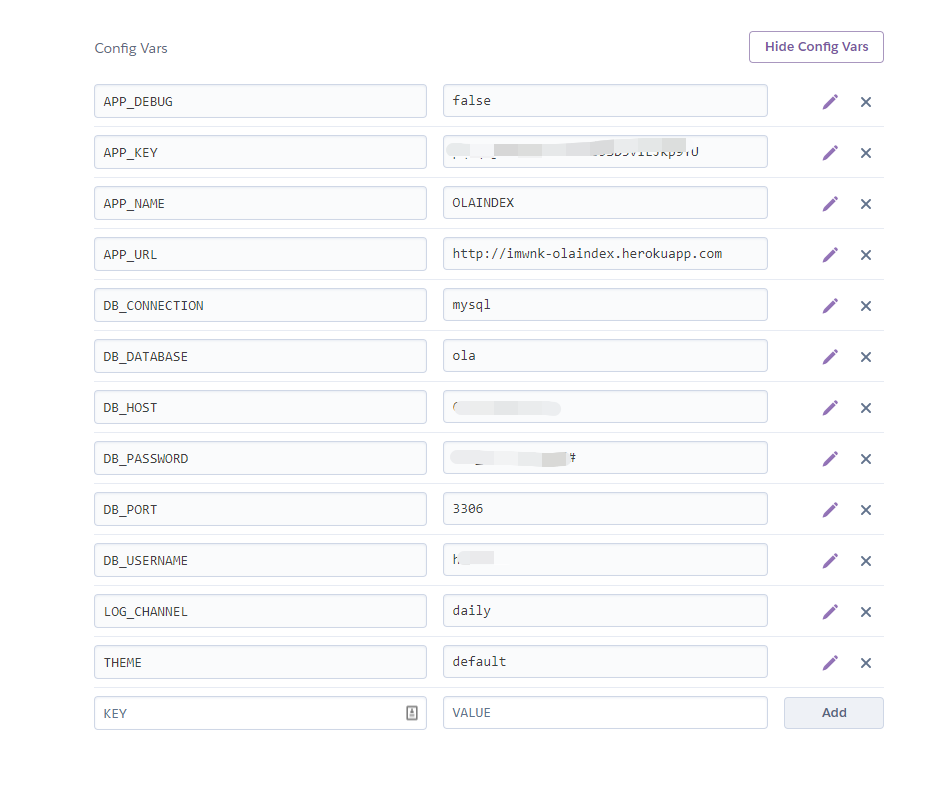
设置 APP key 及绑定域名
Laravel 使用 App Key 来完成对用户会话及其它信息的编码加密操作,因此我们也需要将 App Key 加入到 Heroku 的配置中。
这里直接打开刚才创建目录中的 .env 文件,复制 APP_KEY参数。
将复制的 APP_KEY 附加到此命令行后面以完成配置:
1
| $ heroku config:set APP_KEY=xxx
|
同样由于授权登录,需要验证绑定域名,这里需要设置一下 APP_URL
1
| $ heroku config:set APP_URL=xxx
|
此外还需要配置其他环境变量 如数据库配置
参考此图填写
将应用推送到 Heroku 上
接下来,让我们把代码部署到 Heroku 上:
1
| $ git push heroku master
|
有类似如下输出则代表代码推送成功:
1
2
3
4
5
6
7
8
9
10
11
12
13
14
15
16
17
18
19
20
21
22
23
24
25
26
27
28
29
30
31
32
33
34
35
36
37
38
39
40
41
42
43
44
45
46
47
48
49
50
51
52
53
54
55
56
57
58
59
60
61
62
63
64
65
66
67
68
69
70
71
72
73
74
75
76
77
78
79
80
81
82
83
84
85
86
87
88
89
90
91
92
| Enumerating objects: 2010, done.
Counting objects: 100% (2010/2010), done.
Delta compression using up to 4 threads
Compressing objects: 100% (637/637), done.
Writing objects: 100% (1934/1934), 301.98 KiB | 20.13 MiB/s, done.
Total 1934 (delta 1332), reused 1872 (delta 1271)
remote: Compressing source files... done.
remote: Building source:
remote:
remote: -----> PHP app detected
remote: -----> Bootstrapping...
remote: -----> Installing platform packages...
remote: - php (7.2.11)
remote: - ext-mbstring (bundled with php)
remote: - nginx (1.8.1)
remote: - apache (2.4.34)
remote: -----> Installing dependencies...
remote: Composer version 1.7.2 2018-08-16 16:57:12
remote: Loading composer repositories with package information
remote: Installing dependencies from lock file
remote: Package operations: 48 installs, 0 updates, 0 removals
remote: - Installing doctrine/inflector (v1.3.0): Loading from cache
remote: - Installing doctrine/lexer (v1.0.1): Loading from cache
remote: - Installing dragonmantank/cron-expression (v2.2.0): Loading from cache
remote: - Installing erusev/parsedown (1.7.1): Loading from cache
remote: - Installing vlucas/phpdotenv (v2.5.1): Loading from cache
remote: - Installing symfony/css-selector (v4.1.6): Loading from cache
remote: - Installing tijsverkoyen/css-to-inline-styles (2.2.1): Loading from cache
remote: - Installing symfony/polyfill-php72 (v1.9.0): Loading from cache
remote: - Installing symfony/polyfill-mbstring (v1.9.0): Loading from cache
remote: - Installing symfony/var-dumper (v4.1.6): Loading from cache
remote: - Installing symfony/routing (v4.1.6): Loading from cache
remote: - Installing symfony/process (v4.1.6): Loading from cache
remote: - Installing symfony/polyfill-ctype (v1.9.0): Loading from cache
remote: - Installing symfony/http-foundation (v4.1.6): Loading from cache
remote: - Installing symfony/event-dispatcher (v4.1.6): Loading from cache
remote: - Installing psr/log (1.0.2): Loading from cache
remote: - Installing symfony/debug (v4.1.6): Loading from cache
remote: - Installing symfony/http-kernel (v4.1.6): Loading from cache
remote: - Installing symfony/finder (v4.1.6): Loading from cache
remote: - Installing symfony/console (v4.1.6): Loading from cache
remote: - Installing egulias/email-validator (2.1.6): Loading from cache
remote: - Installing swiftmailer/swiftmailer (v6.1.3): Loading from cache
remote: - Installing paragonie/random_compat (v9.99.99): Loading from cache
remote: - Installing ramsey/uuid (3.8.0): Loading from cache
remote: - Installing psr/simple-cache (1.0.1): Loading from cache
remote: - Installing psr/container (1.0.0): Loading from cache
remote: - Installing opis/closure (3.1.1): Loading from cache
remote: - Installing symfony/translation (v4.1.6): Loading from cache
remote: - Installing nesbot/carbon (1.34.0): Loading from cache
remote: - Installing monolog/monolog (1.23.0): Loading from cache
remote: - Installing league/flysystem (1.0.48): Loading from cache
remote: - Installing laravel/framework (v5.7.12): Loading from cache
remote: - Installing fideloper/proxy (4.0.0): Loading from cache
remote: - Installing guzzlehttp/promises (v1.3.1): Loading from cache
remote: - Installing psr/http-message (1.0.1): Loading from cache
remote: - Installing guzzlehttp/psr7 (1.4.2): Loading from cache
remote: - Installing jakub-onderka/php-console-color (v0.2): Loading from cache
remote: - Installing nikic/php-parser (v4.1.0): Loading from cache
remote: - Installing jakub-onderka/php-console-highlighter (v0.3.2): Loading from cache
remote: - Installing dnoegel/php-xdg-base-dir (0.1): Loading from cache
remote: - Installing psy/psysh (v0.9.9): Loading from cache
remote: - Installing laravel/tinker (v1.0.8): Loading from cache
remote: - Installing guzzlehttp/guzzle (6.3.3): Loading from cache
remote: - Installing league/oauth2-client (dev-master 15afb12): Loading from cache
remote: - Installing microsoft/microsoft-graph (1.5.0): Loading from cache
remote: - Installing caouecs/laravel-lang (3.0.56): Loading from cache
remote: - Installing overtrue/laravel-lang (3.0.13): Loading from cache
remote: - Installing predis/predis (v1.1.1): Loading from cache
remote: Generating optimized autoload files
remote: > Illuminate\Foundation\ComposerScripts::postAutoloadDump
remote: > @php artisan package:discover
remote: Discovered Package: fideloper/proxy
remote: Discovered Package: laravel/tinker
remote: Discovered Package: nesbot/carbon
remote: Discovered Package: overtrue/laravel-lang
remote: Package manifest generated successfully.
remote: -----> Preparing runtime environment...
remote: -----> Checking for additional extensions to install...
remote: -----> Discovering process types
remote: Procfile declares types -> web
remote:
remote: -----> Compressing...
remote: Done: 19.2M
remote: -----> Launching...
remote: Released v5
remote: https://imwnk-olaindex.herokuapp.com/ deployed to Heroku
remote:
remote: Verifying deploy... done.
To https://git.heroku.com/imwnk-olaindex.git
ab88070..42cd315 master -> master
|
代码推送成功之后,使用此命令可快速打开线上应用:
接下来进入命令行执行数据库迁移
1
2
3
| $ heroku run bash
$ php artisan migrate
$ php artisan db:seeder
|
执行完毕后
至此,我们便完成 OLAINDEX 应用的部署.
…接下来就是直接线上部署相关配置
演示站点
https://imwnk-olaindex.herokuapp.com
注意
更新仓库
熟悉 git 的用户可以直接将本项目的 github 仓库,添加到本地的 remotes ,这样 github 更新就可以拉取并将其合并到 heroku 仓库里,再重新进行更新。注意更新后要进行重新部署项目。不过免费的空间肯定需要折腾点。

此图来自 http://imwnk-olaindex.herokuapp.com
参考文章:如何快速使用 Heroku 来部署你的 Laravel 应用